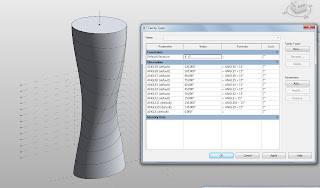
오늘은 어탭티브 닷툴을 이용한 순응가능한 구조모델입니다. 건축쉘은 언제든 건축진행단계에 프로그램의 요구라든지 환경적 요구등에 의해 변화되며 이러한 변화에 쉽게 적용하기위한 구조체가 쉘에 연동되어 움직이는 모델을 제공하는것입니다.
보시는 사진은 쉘을 변화시키는 것에 따라 변화되는 구조체의 모습을 보실수 있습니다.
(This is an adaptive structural model generated by adaptive dots. Skin shell could be easily changed in the process of design. With this model, struc model is easily and quickly corresponding with shell changes.)

먼저 이러한 스트럭쳐를 만들기위해 어댑티브 매스를 열고 아래와 같이 필요한 수만큼의 shape handle dot을 찍고 make adaptive합니다.
(First of all, open a new adaptive mass and arranged dots as needed then change the properties of all dots to shape handle dots except one which is placement dot as shown with number 1.)

보시는바와 같이 상부 6개의 점은 쉐입을 형성하고 하부 가운데에 보이는 1이라는 숫자의 점은 위치 설정 점이 됩니다. (As shown on pic, upper 6 dots would make a shape depending on the host element and one dot with number 1 will be a placement dot.)
이점들은 레퍼런스 라인으로 연결한후 스위핑을 통해 실제 스트럭쳐를 만듭니다.
(Now, conneting all shape handle dots with reference line then sweep a profile to get a actual structure member.)
 이 스트럭쳐를 새로운 어댑티브 매스로 가져옵니다. (bringing this structure into another new adaptive mass which has 6 guide lines, it would be hosts for each shape handle dots.)
이 새로운 매스속에는 이 스트럭쳐가 호스트할 6개의 가이드 라인 그리고 이들 가이드라인에 각 스트럭쳐의 어댑티브 점들을 호스트 시킵니다. (Attaching each dot on guide line.)
 이후 이 가이드라인들을 선택하여 쉘을 형성하면 위에서 보여드린 사진들의 쉘들을 형성하게 됩니다. 이후 이 쉘들은 선택툴에 의해 선택후 움직이면 구조체는 호스트인 쉘의 움직임에 따라 자동으로 움직이게 됩니다. 구조하시는분들에게 많은 업무를 줄일수 있을듯하네요 특히 이런 복잡한 쉐입의 빌딩에서는요..
(After making shell with guide lines, these structures would be adapting to the change of shell shape as a pic on the top.)
 This is a way of pattern making by push and pull the front glazing on each unit by image data.


 And, bring this family into rec. curtain panel by pattern and linked color options. Also, assigned all dimensions and angles for panel schedule. I got schedule and exported to Excel to sort out and here is image.


 And, tada...


 This is the helix mass for solar testing.


 Here is video clip link.


 Revit mass image which is applied by bitmap image
 And,,,,movie clips


 이 패턴을 매스에 적용합니다. (Apply this patten on mass surface.)
 다음 플러그 인 툴을 이용해 비트맵 이미지를 적용합니다.
